
Copy Trade is a special mode for forwarding a trade idea to a shared copy-trade strategy instead of placing it on your own broker account. When you submit through Copy Trade, the signal is sent to the shared strategy, where other subscribers can pick it up.
How it differs from Hybrid Trade
- Hybrid Trade places a real order on your broker account immediately.
- Copy Trade broadcasts the trade idea to a shared copy-trade strategy. No order is placed on your account from this page.
Using the page
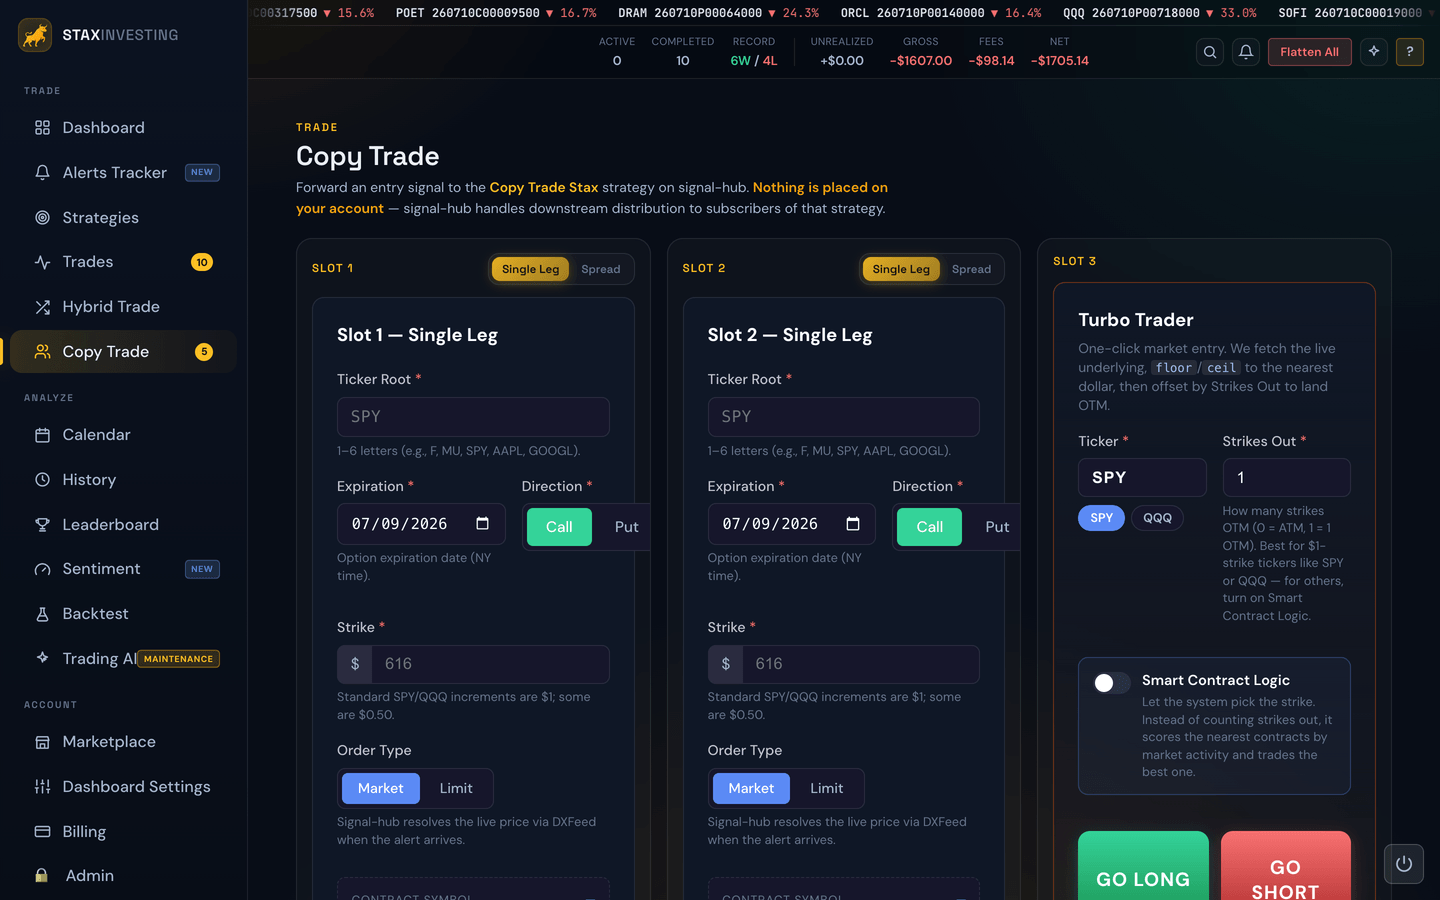
The Copy Trade page has three entry slots so you can pre-stage multiple ideas (for example, a call setup on SPY and a put setup on QQQ) without retyping the form each time. The first two are full-detail slots where you fill in the same fields as Hybrid Trade — ticker, expiration, strike, direction, quantity, and order type. The third slot is Turbo Trader (see below), a one-click way to fire an alert without picking the exact contract yourself.
When the moment is right, click submit on the slot you want to send. The other slots stay queued and can be sent later (or cleared).
Today's alerts
Like Hybrid Trade, this page shows today's incoming alerts so you can act on the same signals you've been watching, but route them through copy-trading instead of your own account.
Note
"Today" follows your device's clock. If you check late at night, you'll still see everything from your own calendar day — the list doesn't reset until midnight your local time. Positions that are still open always stay on the list no matter the hour.
Single Leg vs Spread mode
The first two entry slots each have a small toggle at the top: Single Leg or Spread. Pick Single Leg when you're broadcasting a plain call or put. Pick Spread when you're broadcasting a multi-leg structure — vertical, iron condor, iron butterfly, anything with more than one leg. The form fields change to match the mode you chose, so you only see the inputs you need.
Both modes offer a Wheel Trade checkbox — tick it when you're fine being exercised (assigned) on the position rather than closing it for cash. Subscribers who have turned Allow Wheel off in their own strategy will skip that alert. It's per-send, so it clears itself after each entry and has to be ticked deliberately each time.
Turbo Trader (Slot 3)
The third slot is Turbo Trader — a one-click way to broadcast an alert when you know the ticker and the direction but want to fire fast. Type a ticker (or tap the SPY / QQQ quick buttons), then press GO LONG to broadcast a call or GO SHORT to broadcast a put. There's no expiration or strike to fill in — Turbo Trader handles that for you.
There are two ways it picks the strike:
Smart Contract Logic is the easy default. Leave the switch on and you don't choose a strike at all. When you press GO, the system looks at the nearest strikes in your direction and picks the one with the best market activity (things like trading volume and open interest), then broadcasts that contract to your copiers. This is the cleanest way to send an alert on any ticker.
Example
You want to send a long NVDA idea. Type NVDA, keep Smart Contract Logic on, and press GO LONG. The system picks the best NVDA call for you and broadcasts it to the strategy — no strike-picking required.
Strikes Out is the manual option. Turn the switch off and a Strikes Out box appears, letting you say how far out-of-the-money to go: 0 is the strike nearest the current price, 1 is one strike further out, and so on. This works cleanest on $1-strike tickers like SPY and QQQ; for other tickers, leave Smart Contract Logic on.
Note
The GO buttons stay disabled for a moment while Turbo Trader fetches a live price for the ticker you typed — that's expected. Once the price is in, the buttons light up. With Smart Contract Logic on, the exact contract is chosen a few seconds after you press GO, so the new alert appears in the table just after.
The alerts list
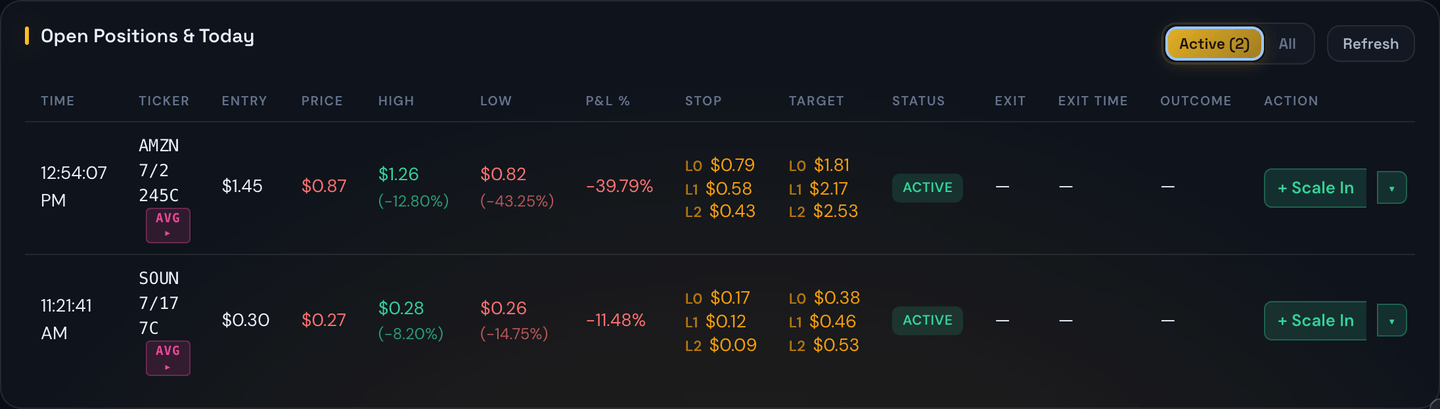
Below the entry slots is a live list showing both today's alerts and any alerts that are still open from earlier — so you can keep an eye on positions that haven't closed yet. Each alert is its own card. At the top of the card you'll see:
- The time the alert was sent and the ticker, with a spread-type pill if it's a multi-leg trade and an AVG pill if the position has been scaled into more than once.
- The status (active or closed) and, once a trade is finished, its outcome — WIN, LOSS, or BE.
- Entry (the price the alert went out at), the current live Price (which flashes when it ticks up or down), and P&L % (how the alert is performing right now).
- High and Low — the best and worst prices the alert has touched since the entry price you currently hold. Each one shows, in parentheses, how far that is from the entry price. For example, an entry of $0.39 with a high of $0.53 shows
(+35.90%). If you Scale In and your average entry changes, the High and Low restart from that moment so they always measure against the average you actually hold (see The averaged (AVG) pill). - For a closed trade, its Exit price and Exit Time, plus a green Max pill showing the best gain the alert ever reached. That best-gain number keeps counting even after the trade closes, right up until the option expires — so you can see how much profit was left on the table if the price kept running.
Below the header, each leg of the trade has its own row showing its take-profit, its stop-loss, and a small progress bar that shows where the live price currently sits between the two. Underneath are the action buttons described below.
Once a leg's price actually reaches one of its targets, the row shows a small badge so you can tell at a glance what happened — a green ✓ the moment the take-profit price is touched, or a red ✕ the moment the stop-loss price is touched. When that happens the progress bar also freezes at that target instead of drifting. The badge is based on the highest and lowest prices the trade has hit since entry, so it stays put even if the price later moves back the other way — a leg that hit its goal keeps showing ✓ even if the price slips afterward.
Example
A leg with a take-profit of $1.50 briefly tags $1.55. It immediately shows a green ✓ and its bar fills to the target. If the price then drifts back down to $1.30, the ✓ stays — so you always know that leg reached its goal, even though the price is no longer there.
Click Refresh at the top of the list to pull the latest snapshot if you want to be sure you're current.
Showing only active positions
Next to Refresh is a small Active / All toggle. By default it's on Active, which shows only the positions that are still live right now — so you land straight on what you're managing. The Active button also shows a count, for example Active (3), so you can tell at a glance how many positions are still working. Switch to All to also see every alert that has already closed today (including closed, expired, and stopped-out ones) when you want to review the day's finished trades. If Active is empty, nothing is live at the moment — switch to All to see the day's history.
Card view vs. List view
Next to the Active / All toggle is a Cards / List toggle that changes how your open positions are laid out — the information and the controls are exactly the same either way, so pick whichever you find easier to read.
- Cards (the default) gives each trade a roomy card with all of its details and buttons on display at once. Great when you're managing just a few positions and want everything in front of you.
- List packs each trade onto a single compact row — time, ticker, entry, live price, P&L %, high, low, and status all lined up in columns, like a table. It's the quickest way to scan a lot of positions at a glance.
In List view the management controls are tucked away until you need them: tap any row and it expands into a drawer with the full set of controls — the same inline stop-loss and take-profit editing, Scale In, Auto-exit, Set all SL / TP, and Close buttons you get on a card. Tap the row again to collapse it. You can have several rows open at once.
The app remembers which view you picked on this device, so if you prefer List it'll still be List the next time you open the page. On a phone the List rows stack neatly with a label on each value, so there's never any sideways scrolling.
Example
You've got eight open positions and just want to see which one is farthest in the red. Switch to List, scan down the P&L % column, tap the worst one to open its controls, and adjust its stop — all without leaving the row.
Changing Stop-Loss and Take-Profit on an alert
To change a leg's stop-loss or take-profit, just click the price right on that leg's row, type the new value, and press Enter (or the ✓ button). Press Esc (or the ✕) to cancel. There's no separate "Modify" button or leg dropdown to work through anymore — you edit the exact leg you're looking at, in place.
If you open both the take-profit and the stop-loss on the same leg before saving, they're sent together as a single update to the broker.
On a multi-leg trade you'll also see a Set all SL and a Set all TP control. Each one sets that value on every leg at once — handy when a trade is running and you want to move all your stops in a single adjustment.
Example
You're up big on a 3-leg NVDA runner and want to protect the gain. Click Set all SL, type a price above your entry, and confirm — every leg's stop jumps up to lock in a minimum win, all at once.
For iron condors and iron butterflies, changing a stop or target still asks whether you mean the call bracket or the put bracket, since those alerts have two stops and two targets. See the Modifying Stop-Loss & Take-Profit topic for the full picture.
When you move a target, the green ✓ / red ✕ badge on that leg starts measuring again from that moment. A price the trade touched before your change no longer counts toward the new target — so nudging a take-profit up won't instantly show a ✓ for a level it hit half an hour ago.
When Profit Lock raises a stop
If the strategy behind this page has Profit Lock turned on, then once one leg's take-profit is reached the stops on the remaining legs are automatically raised to protect the win. When that happens, the leg's stop on this page shows the raised price with a small 🔒 beside it, so what you see matches the stop your real trade is actually protecting.
Example
A 2-leg alert entered at $0.80 with targets at $1.00 and $1.30, Profit Lock at 50%. Leg 1 tags $1.00, and leg 2's stop on the card jumps from $0.65 to $0.90 🔒 — already above the entry.
See Multi-Leg Exits for how Profit Lock decides the new stop.
Scaling in
If you want to grow the position on an alert that's already live, use Scale In. The split button lets you either send the additional contracts at market (one click, fills immediately) or at a limit price you type in. Scale-in works for both single-leg and spread alerts. When a position has been scaled into more than once, the ticker grows a small AVG pill so you know the entry price you see is a blended average of every fill.
Closing an alert
Close All ends the whole position — every leg at once.
On a multi-leg trade, each leg's row also has a small × button, so you can close a single leg and let the rest keep running — for example, take one leg off the table and let your runner ride.
For an iron condor or iron butterfly, the Close button instead opens into three choices:
- Whole Spread — closes every leg at once.
- Close Call Side — exits only the call legs and leaves the put side running.
- Close Put Side — exits only the put legs and leaves the call side running.
This is the same behavior described in the Spread Trades topic.
Whole-trade auto-exit
Sometimes the price blows past every leg's stop or target but the position keeps lingering until someone closes it by hand. Auto-exit fixes that: you set a single take-profit and/or stop-loss price for the entire trade, and the system watches the price for you. The moment the price touches either level, the whole position closes — every leg, for all subscribers — automatically.
Because this runs on our servers, it keeps working even if your browser is closed. You don't have to be watching the page for it to fire.
On an active single-leg or runner trade, click + Auto-exit, type a whole-trade take-profit and/or stop-loss, and confirm. The armed levels show as a green TP chip and a red SL chip; use Edit to change them or Clear to turn auto-exit off. Once armed, each chip has tiny ▲ / ▼ arrows next to it — tap them to nudge that price up or down by $0.01 and it saves instantly, no need to open Edit. It fires once — when a level is hit the trade closes and auto-exit switches itself off.
Example
You're in a SPY call at $2.40 and want a hard safety net you don't have to babysit. Click + Auto-exit, set the stop to
$1.20, and confirm. If the option drifts down and touches $1.20 — even overnight, with your laptop shut — the whole position closes for everyone.
Note
Auto-exit is a whole-trade safety net for single-leg and runner trades. It's separate from each leg's own working stop and target, which you can still edit inline. Spreads keep their own Close controls instead.
The averaged (AVG) pill
When you see an AVG pill next to a ticker, it means the position is the result of more than one fill — either because the original order was filled in pieces, or because you (or another subscriber) used Scale In. The entry price shown is the weighted average of every fill. The individual orders (each with its own time, quantity, entry, and P&L) are listed right at the top of the card, above the legs, so you can always see exactly what makes up the average — no need to expand anything.
Note
Each time you scale in and the average entry changes, the High and Low columns reset to the current price and start tracking again from there. Your earlier peak and dip were measured against the old entry, which no longer applies once the average moves — so the reset keeps the High/Low percentages honest against the price you actually hold now.
Tip
Copy Trade does not place anything on your broker account. It broadcasts the alert to the shared strategy. If you want the same trade to run on your own account, use Hybrid Trade instead — that's the page that talks to your broker.